If you’re a new sewing machine owner, you might be overwhelmed by the set-up it requires. It seems like there are so many gears and moving parts. How do you get it to make perfectly even stitches? Do you have to have an engineering degree just to thread a simple machine?
If this sounds like you, don’t worry! We’ve put together a super detailed guide complete with everything you need to know about threading a sewing machine. It seems like a lot of information, but with a little practice, you’ll be able to prepare your machine for sewing in five minutes flat.
In this guide, we’ll tell you how to shop for materials, how to thread your machine step by step, and how to know if you’ve done it correctly! Plus, we’ll even throw in some tips and tricks to make the process easier.
Materials
The first step to threading your sewing machine is to purchase all the materials. Once you know what your project will entail and what fabrics you’re going to use, consult a needle guide, as well as a thread guide. We’ll go through the basics below for your convenience.
Needles
Sewing machine needles are categorized by their thickness and their purpose. The purpose is what the needle is used for, and the thickness is their size.
The thicker a sewing machine needle is, the thicker fabric it will be able to sew. Smaller needles are better for finer fabrics. The most common sewing machine needle sizes, from smallest to largest, are 60/8, 70/10, 75/11, 80/12, 90/14, and 100/16. A 60/8 needle would be used for fine fabrics like silk and organza, while a 100/16 would be better for denim and canvas.
There are a wide variety of sewing machine needles available, each with different purposes. Some are used for everyday sewing, while others have more specialty uses. The most common type of needle you’ll be using is the Universal Needle. As the name suggests, it can be used for all types of different fabrics, from woven to stable knits, natural fibers, or synthetic.
Another common needle you’ll see is the Ball Point Needle. Ball Point Needles are best used for tightly woven fabrics and knit fabrics with a lower stretch factor, such as cotton, polyester, or cotton-polyester blends.
The other general-purpose needle you’ll often come across is the Sharp or Microtex Needle. Sharps have a narrow shaft and a sharper point that can pierce through finely woven fabrics. Sharp needles are best for silk, chintz, lightweight faux suede, and other microfiber fabrics.
In addition to these general-purpose needles, there are a variety of specialty needles made for specific fabrics, such as Denim Needles and Leather Needles. While not strictly necessary, these needles can be helpful when working with unique or challenging fabrics.
Thread
Just like needles, there are a huge variety of different threads that can be put into your sewing machine. Each type of thread works best for different purposes and different projects.
- Cotton Thread: This type of thread is a great all-purpose thread and can be used for a variety of different projects. This is a great thread to keep stocked around the house.
- Embroidery Thread: Embroidery thread can be stranded and divided into smaller threads. Embroidery threads usually come with six individual strands. It’s not the strongest, but it is great for decorative purposes.
- Polyester Thread: Sometimes called “all-purpose” thread, polyester thread is great for a variety of uses. It’s suitable for all types of fabric, including stretch. Polyester is the most commonly used type of thread.
- Quilting Thread: As the name suggests, quilting thread is great for quilts. It comes with a waxy coating that allows it to travel easily through layers of quilting and batting.
- Shirring Thread: Shirring thread is very elastic and stretchy, and is best used for sewing rows in the waist and chest areas of garments.
- Heavy-duty Thread: This thread is a mixture of cotton and polyester and has a very strong hold.
- Nylon Thread: Nylon is a very strong thread, and is suitable for light to medium weight fabrics.
- Silk Thread: Silk thread is always used for embroidery purposes, as it’s very delicate. It can be used for fine work on silk, as well as wool.
- Wool Thread: Wool thread is used for embroidery and heavy fabrics, such as wool and canvas. It works well for bulky items such as blankets.
- Invisible Thread: Invisible thread is thin and clear, so it’s invisible when used correctly. It looks somewhat similar to fishing line.
There are thousands of different types of thread you can use with your sewing machine, but most will fall into one of the above categories. Once you know what your project will entail and what kind of fabric you want to use, select a compatible thread from one of the categories above.
How To Thread A Sewing Machine
Once you’ve purchased your materials and fitted the needle onto your machine, you’re ready to begin the threading process. Begin by familiarizing yourself with the basic parts of the sewing machine, so you’ll understand where everything is located. If you still have your sewing machine’s manual, now is a great time to consult it, as these instructions may vary depending on the model of your machine. Once you feel comfortable with the basics of your machine, you’re ready to start threading!
Step One: Wind The Bobbin
First, you’ll begin by filling the bobbin with the thread you’ve selected for this project. To do this, you’ll place your spool of thread on the spool pin. Then, slide the spool pin holder/cap firmly over the rim of the spool to prevent tangling. Now, push the bobbin winder pin to the far left.
Pass the thread from the spool through the thread guide on your machine. Pass the thread end through the small hole in the rim of the bobbin, then place the bobbin onto the pin. Push the bobbin winder pin to the right. This will stop the needle from moving.
Hold onto the thread end, and step on the pedal to run the machine. Keep going until you have enough thread on the bobbin. Cut the thread, push the bobbin to the left, and remove it from the bobbin winder pin. Congratulations, you’ve successfully wound your bobbin! If you have trouble keeping your bobbins organized, try our handy bobbin organizers.
Step Two: Threading The Machine
If you haven’t already done so, place the spool of thread on the spool pin located at the top of your machine. Depending on what type of machine you have, it may be standing up or horizontal. If your machine has one, place it on the spool pin holder/cap.
Now, pull the thread through the thread guide at the top of your machine. The guide will look different depending on the model of your machine. It may be a large plastic piece with a slit for the thread or a small knob to wind it around.
Next, pull the thread down towards you, and loop it around the tension discs below. Pull the thread back up again into the second thread guide. This will have a lever with an eyelet, usually referred to as the take-up lever. Your thread should now form a U-shape in the machine.
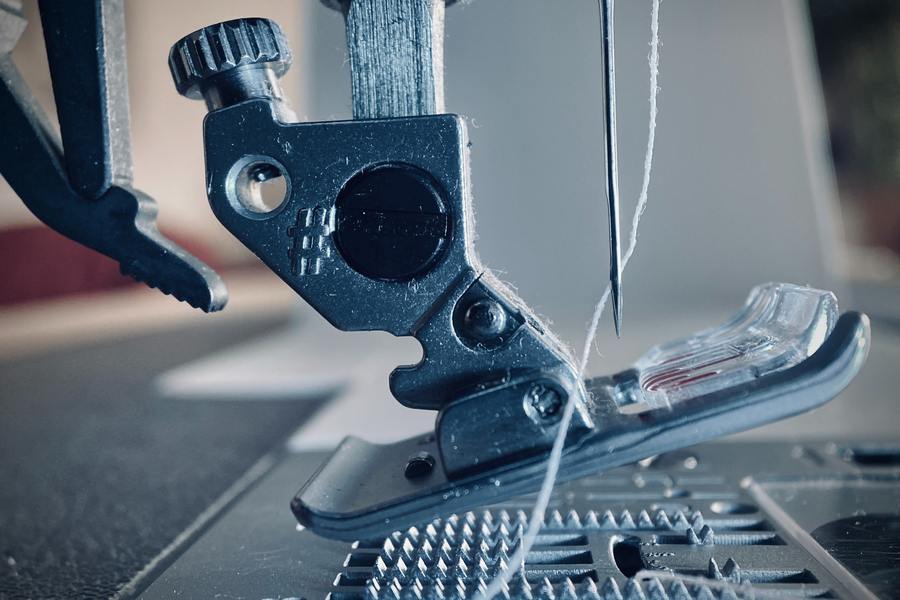
Now, bring the thread down to the needle, following any hooks your machine has to hold the thread. Thread the needle from front to back. If you have trouble threading needles, invest in an automatic needle threader like this one.
Now, you’ll insert your wound bobbin into the bobbin case, as directed for your specific machine. Your machine may have the bobbin loaded from the top or from the front. Turn the flywheel (aka the big wheel on the right of your machine) towards you, so the needle hooks up the top thread with the bottom thread. Bring the thread from the bobbin to the top of the machine plate, where the needle moves in and out.
Find the loop of the bobbin thread that is being caught, and pull it out. You may need to use tweezers to grab it. Gently pull both threads, the top and the bottom, to the back. They should run freely as you pull them without snagging on anything. This is how you know your machine has been threaded correctly.
Step Three: Test
Now, it’s time to test your work! Grab a piece of scrap fabric, and test your stitches, as well as your tension. Hold the threads gently as you start sewing, so they don’t get tangled. Remember to lower the foot before you begin, as this steadies the fabric and connects it with the feeder mechanism.
If your machine sews smoothly, you’ve successfully threaded your sewing machine, and you’re ready to tackle any project.
Conclusion
Threading a sewing machine may look intimidating, but with a little practice, you’ll be able to do it without even thinking. If you’re passionate about all things sewing and quilting, visit Love Sew. We share sewing tips, tricks, and tutorials and sell amazing sewing equipment that will make any project a breeze.
Sources:
Sewing Machine Needle Charts | sewing.org