It's a great day for a quick (cute) sew!
Carry your computer or tablet in style with a zip pouch made from your favorite fabric...I'll show you how easy it is to make and some fun ideas for making yours personal.
This pouch is for a laptop computer, but you can use the same techniques to make a tablet case, portfolio or hold-all for whatever you need to keep handy and corralled.
Read all the instructions before you start. At the end I'll give you some ideas for variations and making it fancy...so check those out before you jump in on your own.

First up, measure! Figure out the size you're making by measuring your device. My laptop is 14" x 10". Add at least 2 1/2" to both those numbers to get the measurements you'll need to cut the fabric pieces. So, for cutting, I'll use 16 1/2" x 12 1/2" for my measurements. When I refer to these measurements, substitute the correct numbers for YOUR chosen size.
Next, gather supplies:

1. Soft and Stable, by By Annie. This is what goes inside the panels of your pouch to give it structure, body, and adds cushion to protect whatever you are carrying. It might be tempting to skip this, but your pouch will be much sturdier and have a nice professional look. Totally worth it! <get it here>
Cut two pieces 16 1/2" x 12 1/2".
2. Zipper. So many options! You can choose to match the zipper to your fabric or get a really bright color zipper to contrast. Zippers with plastic teeth are easier to work with and to shorten if needed. Get a zipper that is 2" shorter than the longer side of your pouch. For my example, since my longer side is 16 1/2", my zipper should be 14 1/2".
3. Lining fabric. Since my exterior fabric is plain khaki and black, I chose a bright color for the lining fabric. You can choose something that matches your exterior or go with a basic solid color. Cut two pieces 16 1/2" x 12 1/2".
4. Zipper tabs. These are scraps of fabric that match the color of your zipper or the exterior fabric of the pouch. Cut four pieces, 2" x 5".
5. Exterior fabric. This is the one you'll see every time you pull out your device so make it a favorite! Cut two pieces 16 1/2" x 12 1/2".
Let's sew!
1. Fold the four zipper tab fabrics in half, wrong sides facing, and press to crease. Leave folded. Start with two tabs and sandwich one end of the zipper tape between them. The creased sides of the tabs should be toward the length of the zipper and the tabs should cover about 1/2" of the zipper end. Sew the tabs together by stitching on either side of the zipper teeth through all layers: both tabs and the zipper tape. Repeat for both ends of the zipper.

2. Start with one half of the pouch: a Soft and Stable piece, an exterior fabric piece, a lining fabric piece, and the zipper.

On the sewing surface, layer one piece of Soft and Stable, then one exterior fabric face up, making sure all four sides align. Place zipper so that the top edge of the tape aligns with the top edge of the exterior fabric piece. The top of the zipper should be DOWN, with the zip pull against the exterior fabric (right sides facing). Then place the lining fabric, wrong side up, so that all four sides align with the layers underneath.

3. If you have a zipper foot for your sewing machine, attach it now. If not, move your needle to position that allows your standard foot to ride next to the zipper teeth, not on top of them.
Sew the top edge of the entire sandwich together at center of zipper tape (1/4" -3/8" seam).
4. After sewing, turn the lining fabric to the back of the unit so that it is right side facing out and the Soft and Stable layer is now sandwiched between the lining and the exterior fabrics. Press the fabrics away from the zipper and top-stitch on the exterior fabric side, 1/8" from the first seam, through all the layers.


5. On the sewing surface, layer the second Soft and Stable piece, then lining fabric piece right side facing up. Place the sewn zipper unit on top, lining fabric face down. The two lining fabric pieces should now be right sides facing, and the first exterior fabric piece should be face up.
Place the second exterior fabric piece on top, right side facing down. Align all the edges, paying close attention to the zipper edge. The unsewn side of the zipper tape should be sandwiched between the second lining fabric (on bottom) and the second exterior fabric (on top, face down). Pin the layers to stabilize for sewing.

6. Sew through all layers at center of zipper tape.
After sewing, bring second exterior fabric around so that the second Soft and Stable layer is now between it and the second lining fabric. Press seam away from zipper and top stitch 1/8" from seam as in step 4.

7. Lay the sewn pouch panel flat on a cutting surface and use rotary cutter and ruler to trim the layers straight on all four sides.
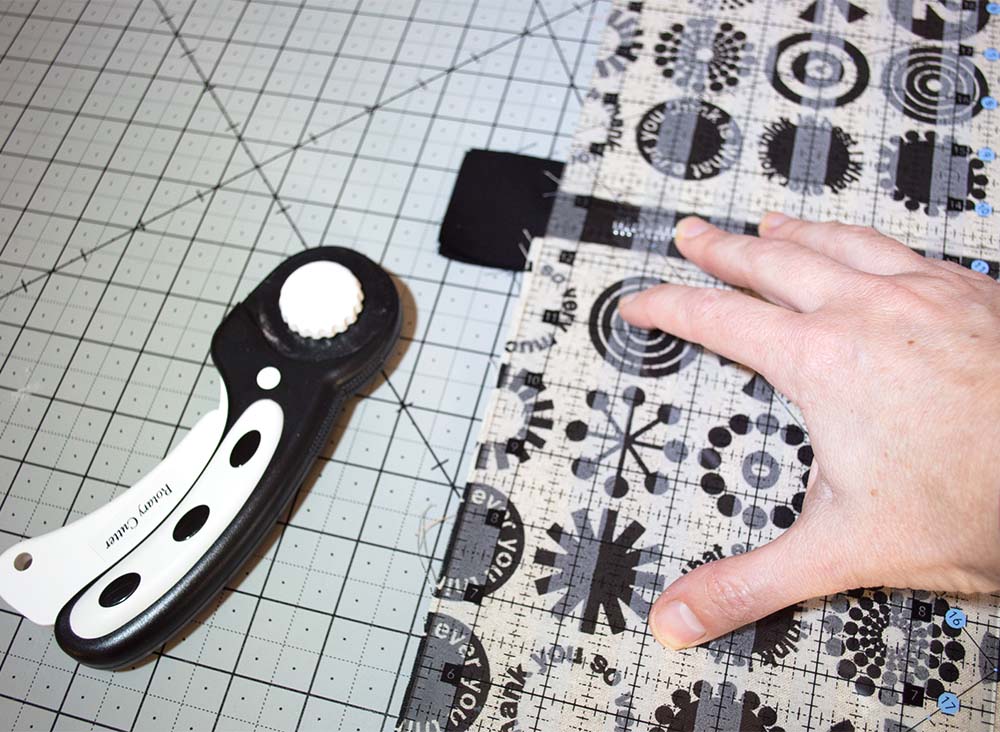
VERY IMPORTANT AT THIS STEP: UNZIP THE ZIPPER. The zipper pull will be most 'out of the way' in the center of the zip tape. Do not leave it zipped closed.

8. With the piece still on the cutting surface, separate the two lining fabrics from their respective Soft and Stable panels and bring them together on one side of the zipper, right sides facing. Align the edges and use binding clips or pins to hold.

Keeping the Soft and Stable layers mated with the exterior fabric pieces, bring the exterior fabrics together, right sides facing on the side of the zipper opposite the lining fabrics. Align the edges and use binding clips or pins to hold. The zipper should be slightly folded toward the exterior fabric side.
9. Sew 1/2" seam around the entire unit, leaving a sizable opening in the lining fabric side for turning the pouch right side out. Secure thread at both ends of the opening by backstitching. Sew carefully over thickness at the zipper. If this area is too thick for your sewing machine to handle, hand stitch the layers with a heavy needle.

10. Gently pull the exterior side of the pouch through the open zipper and the opening in the lining fabric. Push layers out at the corners from the inside.

11. Turn the raw edges of the opening in the lining inside and press. Use sewing machine to topstitch the space closed with matching thread.
Push the lining through the zipper inside the pouch and smooth it to cover the interior.

Put your laptop or tablet inside, stuff it full of art supplies, or your on-the-go sewing project....you are ready to show off your fabulous pouch!
This pattern is easy to customize for your personal taste or make as gift. Here are few things to try and maybe get your imagination going, too:
-For a quilted texture on the pouch, cut the Soft and Stable and exterior pieces as directed. Before sewing them to the lining or zipper, quilt them on your sewing machine or by hand (note: only quilt the Soft and Stable and the exterior fabrics together, not the lining fabric). This is a fun place to play with colorful threads, decorative stitches or embroidery. *Try this: bias tape applique!
-The exterior fabric doesn't have to be all one piece! Use orphan quilt blocks, sew scraps into a crazy-quilt style panel, or sew strips from a 2 1/2" roll up together. There's no limit to how creative you can be with the exterior panels, just trim them to the right size before sewing them into the pouch.
-I love pouches I've seen made from utilitarian looking fabric like natural linen or canvas with a bright color zipper to give it a pop. Play with color, fabric prints, and contrast to make the pouch fit its purpose or the person it's made for.
-Mix it up! As you saw, for my pouch, rather than using one fabric for the lining, I chose a polka dot and a stripe of the same color. It makes for a fun surprise every time you open your pouch.
We would love to see what you make with this! Show off your pouch and tell us what you use it for in the Love Sew Facebook group. No doubt your friends will want to know where you got it... send them here to make their own!
Find supplies such as fabrics, Soft and Stable, thread, specialty sewing machine feet and more at the Love Sew Shop.
❤️ Sharon